The most useful feature of ROS that benefits our team is the realtime camera view. We use it a lot for tuning and calibrating the camera. It is also very useful for debugging. This post will explain how we get the realtime camera view on the laptop.
Basic concepts
Generally, ROS is nothing to do with “Operating System”. It is just a message communication framework. You can transfer data between nodes through ethernet by the three default messaging model in ROS: Publish/Subscribe, Service/Client, and Action. The pub/sub model is the mostly used one.
Publish/Subscribe model
This is a really simple conceptual communication model. It’s similar to newspaper or magazine subscription. The subscribers can subscribe “topics” they’re interested in. The publisher of a certain topic will publish messages to all subscribers that subscribe the topic. All the message passing goes through ethernet. So the publishing/subscribing can happen between nodes within the same machine, as well as transferring through nodes on different machines.
Master node
To implement this protocol, ROS design a central node call “master node” that keeps all information about the topics, including the address of its publisher and subscriber. When a subscriber wants to subscribe a topic, it needs to register it through the master node, and then the master node will pass this information to publisher. When a publisher has something to submit, it will send the messages to the subscriber list provided by master node.
Setup a ROS Melodic environment on your laptop
If you’re using Ubuntu Linux, you can directly install ROS Melodic by going through this official tutorial.
If you’re running Windows or other operating system, you may want to use Virtual Machine to setup an environment. You can setup a brand new VM from scratch, install Ubuntu, and go through the tutorial mentioned above to setup one. But if you’re lazy or are afraid of making mistake. You can use the VirtualBox image we build for you.
The image has Ubuntu Mate 18.04 installed with ROS Melodic and some essential package. Just import it into VirtualBox and launch.
The default password for user raceon is Fight On!. If you need to grant sudo permission.
Locating your master node
In the pre-built race-on-ros code delivered to all teams, we start a master node by roscore command when the raspberry pi boot. So you already have a master node running on raspberry pi. What you need here is to tell the ROS on your laptop “where is the master node”.
This is done by setup an environment variable called ROS_MASTER_URI.
If you use my VBox image above, open ~/.bashrc and you’ll see the following line at the bottom of the file.1
export ROS_MASTER_URL=http://localhost:11311
By default, the master node address is set to localhost, which means the current machine. You need to change localhost to your raspberry pi’s hostname. (i.e. the host part of the link to your jupyter notebook: raspberry-xxx or raspberry-xxx.local).
Once you changed, restart your terminal or run following command:1
source ~/.bashrc
Then, try the following command to test the connection1
rostopic list
You’ll see at list two default topic (if you already have some nodes other than master running, you will see corresponding topic listed also)1
2/rosout
/rosout_agg
If you see an error states that cannot connect to master, it means that the uri you set is incorrect or there’s some network issue between your laptop and rpi.
For more information about setting up multiple machine connection, see this official tutorial.
Launch the camera node
You can start the nodes by running the launch file we provided and set speed to zero to prevent your car from running into a car accident. Or launch just the camera node by rosrun:1
rosrun raceon camera.py
If you launch it by the launch file, the default topic name for camera image is /raceon/camera/image. If you use rosrun, the default topic name is /camera/image.
Use rqt_image_view to see the realtime streaming
Go back to your laptop, execute rostopic list again and you’ll see the topic name for camera image showing up.
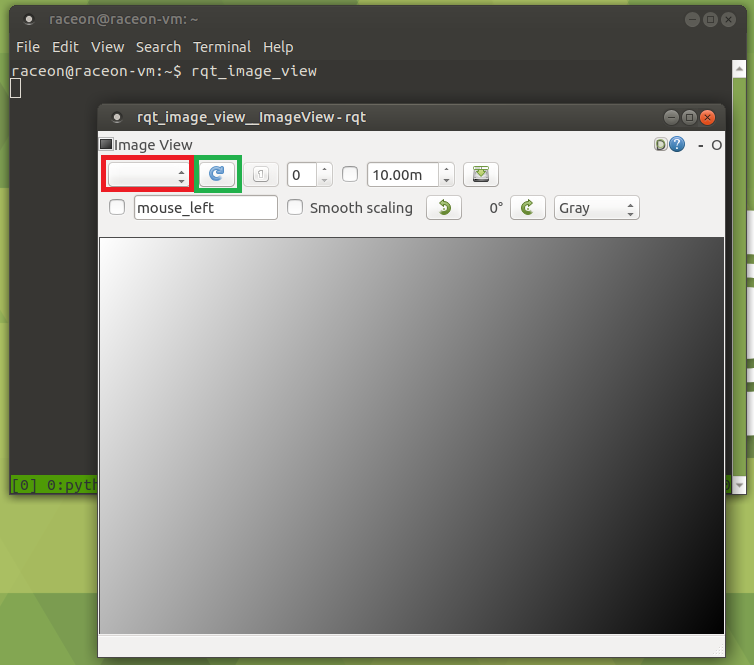
Then execute rqt_image_view from the terminal and you’ll see the following. If all your setup is correct, you’ll see the camera’s topic name listed on the drop-down menu (red box), select it, and the live view will show up below. If you don’t see it, try to hit the refresh button (green box) and check again. If you still cannot see anything in the drop-down menu, that means there’s something wrong with the connection between your laptop and rpi.

Sometimes you may see the topic name but the image won’t show after you select the topic. This is probably the situation that your laptop can connect to rpi but not for the reversed direction (rpi->laptop). Check if you can ping your laptop by using laptop’s hostname. By default, nodes are communicated by hostname.
Summary and Future works
Thanks to ROS, we can easily transfer information from our devices to laptop, helping us to debug the hardware, but there’s one thing should be considered is I/O operation is always slow. If you want to push your code to have higher performance, you may want to decrease the data transfer happens in your stack.
To get more information help us figuring out the possible problem during race, I use opencv to wrote a visualizer that subscribe not only the camera image but other useful data, and visualize it. We use this little tool to debug and calibrate the camera before each race so that we can make sure every lap the car perform is almost identical. If you’re interested in that, the code is available on GitHub (d4n1elchen/raceon_visualizer). It is a ROS package. Clone it into the src folder in your catkin workspace, catkin_make, and run roslaunch raceon_visualizer visualizer.launch. By default, it is listening to /raceon/camera/image. You can change it in the launch file. If that helps you, don’t hesitate to give me a star or follow my GitHub profile! Thanks!
